Sunday, 19 June 2016

War of 1812 Naval Wargaming; Scales and Scenarios

Scenarios So Far


1. The Attack on the USS Oneida; On July 19th the Royal George, Moira and Regent (sloop) attacked the only American warship on Lake Ontario at Sacket's Harbour. The British did not succeed and the Americans took all of the guns from the shore side of the Oneida and mounted them on shore as the British approached. The lack of experience and leadership of the British Provincial Marine showed and they were unable to take the Oneida. 


2. The Battle of Lake Erie / Put in Bay; The British were seriously outgunned and undermanned in this one but still have a slight chance (maybe). As a "What If?" the British can set up on a more advantageous position. Perhaps on springs near a shore line. 

Another "What If?"; The British could attack the Lake Erie fleet before it was refitted just after launch


3. The Attempted Capture of the Royal George on Nobember 6th 1812. Isaac Chauncey had only been in charge of the American naval forces for a few weeks but had already converted a number of merchant vessels and started building new ships. The newly formed Ontario fleet attacked the Royal George right in Kingston Harbour. 


4.  The so called "Burlington Races"; One of a couple of limited engagements where the two fleets fought on Lake Ontario. On September 28th 1813 the two fleets became heavily engaged briefly. Just before this they had a long range running battle of the Geonesse. 


5. "What If?" May 8th 1814; Assault on Sackett's Harbour
With the launch of the Prince Regent and Princess Charlotte the British had naval dominance in the spring of 1814. They were aware that the Americans had just built the Superior but the almost complete USS Mohawk, that would turn the tables again. Drummond and Yeo wanted to do this land and sea assault but Prevost said no. Instead of this assault the British successfully took Oswego. From May to June 5th Yeo blockaded Sackett's Harbour. He then stayed at Kingston awaiting the launch of the St. Lawrence. 

6. "What If?" July and August 1814; The Battle at the Mouth of the Niagara River
In July and August the Americans trapped the Star 14, Charwell 13, Netley 9, and Vincent (the Magnet 11, was blown up to avoid capture) up the Niagara with the Jefferson 20, Sylph 18, and Oneida 14. The battle would be the British ships engaging the Americans. The British controlled the forts on both sides of the river. They are outgunned but perhaps with the forts this could be a good battle. 

7. "What If?" July / August 1814; The Battle of Kingston Harbour
Chauncey blockaded the British with the Superior 58, Mohawk 42, Pike 26, and Madison 23. The Jones 21, was sent to try and raid their supply line. The British had the Prince Regent 58, Princess Charlotte 40, Montreal 21, Niagara 21 and an unknown number of gunboats. Chauncy hoped for a battle but Yeo was awaiting the completion of the St.Lawrence. This could have been a decisive battle. The American ships had more long guns and larger ships. With 10 gunboats or so perhaps the British could have tried their odds. 

8.  Plattsburgh / Lake Champlain; with a simultaneous land battle. 

The HMS St. Lawrence, launched in the fall of 1814. It was larger than the HMS Victory. The British had two more this size to launch in 1815. 

The USS New Orleans and USS Chippawa were larger than the British first rate ships. 

9. Lake Ontario What If? 1815; The British with three first rate ships and two frigates vs two American first rate ships and their two frigates (all of the American ships were bigger than the British ships)

Thursday, 9 June 2016

War of 1812 Naval Wagaming

  While gaming Plattsburgh, we were talking about how nice it would be to have the naval battle being played at the same time. 

   I have gamed Napoleonic ship games extensively with my dad when I was a kid. We would play Trafalgar with ships that were around 1:2000 scale. 

  I want to make one scale of ships to play Lake Ontario, Lake Plattsburgh, Lake Erie and small ocean battles. Later on I would also like to do large Napoleonic ocean battles (maybe at 1:900).

  I found several manufacturers of different scales, but in the end, I like building things, more than I like painting. Also, I didn't want to spend a fortune. 

  I found the perfect solution; The War Artizan. His ships are cardstock and easily found materials. He has ships scaled for 1:300 for Lake Erie, plus a line of 1:600 and 1:900 Napoleonic ships (including American heavy frigates). I bought his complete 1812 and Napoleonic range for $75 Canadian. That's for around 40 ships with all the variants, from gunboats to a first rate line ship. His service was super speedy, in a few hours I had the invoice, had paid him and had all the files. 

And the finished products look awesome. I don't plan on making bases for mine, as I don't like the look. The scene below is what I am striving for. 


http://www.warartisan.com


I wanted one universal scale for my ships, and there are very few line ships in these battles. I tried shrinking down the sloops and gunboats to 1:600 but it was redicilously small, so instead I am increasing the 36 gun to 100 gun ships to 1:300; this makes the HMS St. Lawrence (which I'm making from modifying HMS Victory truly enormous; around 8 inches long without rigging. I will post photos as I work on them. I'm starting with Lake Ontario for 1814; full of "What Ifs", and a strange mix of super huge and super small warships. 

I will be making a list of all manufacturers for War of 1812 ships and rule sets coming up. 


Saturday, 4 June 2016

The Battle of Plattsburgh Battle Report

The Battle of Plattsburgh; Wargame Battle Report
*This game was fought with the old scenario rules. Two brigades should have appeared behind the American forts not crossed at the mouth.

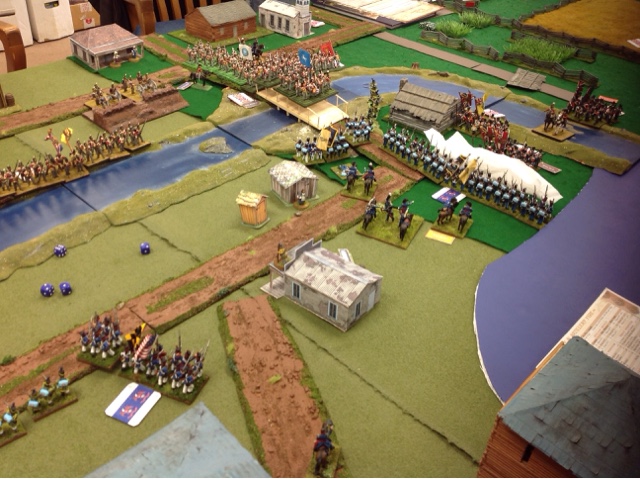
Today our wargaming group played the Battle of Plattsburgh. Overall, it is is one of my favourite scenarios so far. We decided it ended in a draw, though the British were winning, the main defensive positions were intact and the British fleet fleet would have arrived by the time the battle was called (no help from shore for the poorly led British fleet).

There were three players on each side. Each British player had a brigade and some guns, each American player had a fort and a small brigade at a ford or bridge. We rolled for sides, I rolled up the American side for this one, and took the middle fort and the brigade at the main bridge. 


My newly created American earthworks for this scenario. The 7th New York Dragoons are visible at left. 

The 1st British brigade approaches the ford, the 3rd British Brigade approaches the main bridge. The Americans start set up, ready to try to stop the British from crossing. 

The 2nd British brigade approaches the other / upper bridge. 

My position at the main bridge. I also have 6 volunteer rifles in the small building at right. The boards are still removed from the bridge at this point. 

The American militia visible at the top hold off the British and actually routed and dispersed the British converged light battalion. They also cause heavy casualties on the line unit at the ford. 


My cannon and line infantry trade volleys and shots with the British line and artillery. To the left, the militia guarding the ford engages in a long fire fight with the British regulars. They take heavy casualties and disperse. 


The Canadian Voltigeurs and Canadian Chasseurs (formerly 5th Select Embodied Militia) plus the 19th Light Dragoons arrive in the forest. *As part of the scenario they could cross at a ford further down river. 

My cannon continues to fire cannister into the British line. The British in turn shoot my cannon crew until it routs. 

The British at the ford keep manouvering, but don't cross yet. We are 6 or 7 turns it at this point. 

Finally a unit crosses as fresh militia approaches.

The militia at the bridge break and run from the French Canadians. The British brigade across the bridge starts crossing unopposed. 


My gun breaks and disperses. The British that have just crossed the ford faill to charge the fresh militia. 

The New York Dragoons position to drive off the Canadians and cavalry. 


My shot up line unit stops a charge by British coming across the bridge, while the militia continue to stop the British attempting to charge them at the ford. My second unit, NY militia, which I've moved behind the main line because of casualties is visible at left. My volunteer rifles come out of the stone mill to attempt to help stop the British crossing the bridge. 


The New York Dragoons charge the British 19th Light Dragoons, and though militia, and outnumbered 2 to 1 somehow win! Huzzah! The British cavalry retreat in disorder. 


Though my small American brigade held well, my line regiment suffers over 50% casualties from shooting, they disperse leaving the the volunteer rifles and last unit of militia (from another player's brigade) facing two British brigades. This is where our scenario ended. The line unit was sure to be dead in the next turn or two. The Americans passed their "25% of the army lost" check but were about to lose another small brigade. 

The British were very bloodied though, most units lost 10 or 20% and several were over 35%. The American blockhouses and forts remained in American hands. The British were too late to help the British fleet. So as in history, a sensible commander may have called off the attack.

Still, this is one I would like to revisit, especially after I properly paint my Canadian Chasseurs.


Saturday, 12 March 2016

New Blog; Dead Wars!

I have been working on my own rule set for large scale zombie war gaming with my local gaming group. I will continue to work on this blog and the War of 1812 as well. 

Here is my intro to the new blog;
http://www.deadwarszombiewargaming.blogspot.com

Dead Wars! A Tabletop Tactical Zombie Wargame

Dead Wars!

I have looked for a tactical zombie wargame where multiple survivors (or multiple groups of survivors) battle each other and zombies. I wanted dozens if not hundreds of zombies on the table. I purchased every set of zombie rules I could find; All Things Zombie, Skirmish Oubreak, Dead Meat, several others. ALL of them I could find. All of them did what they were supposed to do well enough, but did not do what I wanted. 

This is my squad based game system. My plan is to have rules for multiple Dead Wars! Subsets;
1. Regular Zombies; this is the main rule set 
2. Rage/ Rabid Zombies
3. Nazi Zombies
4. Musket Era Zombies
5. Medieval Zombies
6. Pulp Zombies; Gaming with Movie Characters

In my system each player will have 1 to 4 characters (usually 3 or 4) with 1 to 6 players. Players will be on the same side or opposite sides. Zombies are game controlled.  The main rules are done. I am just playtesting and tweeking. Characters have action points. Each player draws a card a turn which can bring in game controlled groups of characters, or have surprise groups of zombies come spilling out of unexplored buildings, or more often give a minor boost or penalty. Buildings have interiors when possible (though it's not necessary).

Recommended Zombie / Survivor Miniatures
1. Warlord Games / Wargames Factory
2. Studio Miniatures
3. Cold War Miniatures
4. Hasslefree Miniatures

Recommended Terrain
1. Stoelzel's Structures (Printable Terrain)
2. 
3. 1:55 scale vehicles, or 1:43 in a pinch


Saturday, 27 February 2016

The Battle of Queenston Heights

The Battle of Queenston Heights; October 13th, 1812

The most well known painting of the battle shows all troop movements at once. 

An accurate depiction of the attack up the heights when Brock was shot.  The soldiers have the wrong shakos however. They should have stovepipe shakos. 


A view from the heights showing how it would have looked at the time. Queenston would be just out of sight to the lower left. The American side of the river is on the right. 


A map from "The Call to Arms" showing the repeated attacks of the natives. 

A second map showing Sheaffe's attack while militia and natives attack the flanks. 

1 Man = 5    1 Cannon = 1

The Battle of Queenston Heights

Stage 1; American Forces land at Queenston and push back the small groups of defenders. They capture the heights and the 2 British guns but spike the cannons.   
Stage 2; In the darkness, General Brock attempts to frontally attack the much larger force. He is killed and the British retreat.
Stage 3; Brock's Aide McDonnell attempts to take the heights a second time and is also killed. 

*This scenario starts here.
Stage 4; Norton leads his 160 Mohawks in a route around the flank of the Americans. When the natives hear of the British retreat half leave the battle. A group of 80 to 100 natives engage the Americans. Lt.Col.Winfield Scott attempts to drive them off but they just evade and continue to harass the Americans from the tree line for several hours. In addition, two 6 pounders are positioned at Vrooman's point and begin firing at the Americans boats. Hearing the yells of the natives just across the river, and under fire from the guns, all remaining American troops (mostly militia) refuse to cross for the rest of the battle.
Stage 5; General Sheaffe arrives in force. He sends his militia and 3 cannons to drive the Americans out of Queenston. He circles around with his regulars and two 3 pounders to the rear of the American position. He then awaits more troops from Fort Chippewa. When they attack, the entire American army routs, is killed, or captured.

British / Canadian Scenario Rules

Victory Conditions; The British have to occupy the heights. No unbroken American units can be on the heights. 

1. British Infantry Shooting in Line Bonus; British / Canadian infantry get +1 to shooting rolls when in line. Militia and Indians do not get this bonus.


Total British Forces
General Isaac Brock *Killed in Action
Major General Sheaffe (Average)

Mohawks *Independent Unit
John Norton (Excellent)

Grand River Mohawks (100 men) x21 (Enthusiastic Conscripts)

Classed as an open order horde

Move up to half and fire

Can change direction freely

Cannot be unformed (they are already)

Move normally through difficult terrain

Can only charge the front of close order units if they are unformed or faltering

-2 open order modifier

May evade as skirmishers

Ignore brigade morale

If routed immediately disperse

0 Open order melee modifier

Fire as conscripts (-2_with just the front rank of figures

May deploy entirely as skirmishers; 2nd Rate Skirmishers (Roll 2D6 per 8 figures)


Upper Canada Militia *Start at Vrooman's Point
Major Thomas Merritt (Average)

5th Lincoln Flank Co. (80 men) x30 (Second Line)
2nd York Flank Co. (40 men)
Raunchy's Coloured Corps (38 men) 
-1 morale

1st and 4th Lincoln, plus 1st York (150 men) x30 (Conscript)
-1 morale
-1 melee
-1 firing modifier

2nd York Militia (40 men) x21 (Conscript)
3rd Lincoln Militia (30 men)
Merritt's Niagara Light Dragoons (25 men) 
*Fought dismounted
-1 morale
-1 melee
-1 firing modifier

Royal Artillery Holcroft's 2 6 Pounders, 1 Howitzer (Veteran)
*advances to the landing
+1 morale


Regulars 
Regulars (Average Command)

49th (Hertfordshire) Foot (184 men) x36 (Veteran)
Grenadier and Light Cos.

+1 morale

Can refuse a flank

+1 to shooting in line

*Up to half this formation can skirmish 


41st (The Welsh) Foot (234 men) x48 (Line)
3 Cos.

+1 to shooting in line


Artillery
Crowther's 2 3 Pounders x2 Cannons (Veteran)
+1 morale


Forces From Fort Chippewa; Arrive at the Heights at 2:00 PM
Captain Richard Bullock, 41st (Average)

41st Foot (156 men) x30 (Line)
2 cos.

+1 to shooting in line


Militia (100 men) x18
-1 morale
-1 melee
-2 firing modifier


American Scenario Rules


Victory Conditions; The Americans have to keep the British from capturing the heights.


1. Linear Tactics; Whole brigades have to have the same formation except to go around terrain and other units.


2. Buck and Ball; American Regulars used “Buck and Ball”; a round shot with 3 buck shots, they get +1 to hit at close range. 


3. Ammunition Problems; American troops carried less ammunition than their British counter parts, and had logistical problems becoming resupplied during battles. Any American infantry unit which rolls a double one for their shooting roll in any turn but their first turn is at half ammunition (inflicts half casualties). A unit will be at full ammunition that does not move or fire for one turn. 


4. Reinforcements; The Americans had thousands of troops that refused to cross the river. They roll 2 dice each turn to see if more milita have crossed. New reinforcements arrive at Queenston. If there are British troops within 8 inches of the landing at Queenston reinforcements arrive at the foot of the bluff instead.


Roll 2 D6s at the end of each turn to see if more reinforcements have landed.

12; Unbroken Indians AND cannons deployed in Queenston. 


10+; Unbroken Indians OR cannons deployed in Queenston. 


7+; No unbroken Indians AND no cannons deployed in Queenston. 


On a Successful Roll;

D6 models arrive (rounded up to the nearest base).They join an existing unit of militia. If there are enough bases, a new unit of militia can be formed. For example; Rolling 1,2,3 would be 3 or 4 models. 4,5,6 would be 6 or 8 models.


American Forces
Overall Command; Brigadier General Wadworth (Poor)

Regulars 
(Average Command)

6th (100 men) x24 (Conscript)
-1 morale
-1 melee
-2 firing modifier

13th (130 men) x24 (Conscript)
-1 morale
-1 melee
-2 firing modifier

13th (130 men) x24 (Conscript)
-1 morale
-1 melee
-2 firing modifier

26th (215 men) x40 (Conscript)
-1 morale
-1 melee
-2 firing modifier

Captain Gibson's Light Artillery 1 6 Pounder (2nd Line)

-1 morale


Artillerymen (Fighting as Infantry)
Lt.Col.Winfield Scott

2nd Artillery (100 men) x24 (2nd Line)
Light Artillery (25 men)

-1 morale

Round down half casualties (at long range only)


3rd Artillery (100 men) x24 (2nd Line)
Light Artillery (35 men)

-1 morale

Round down half casualties (at long range only)


NY Militia
Average Command

16th NY Militia (200 men) x36 (Conscript)
-1 morale
-1 melee
-2 firing modifier

17th NY Militia (140 men) x30 (Conscript)
-1 morale
-1 melee
-2 firing modifier

18th NY Militia (200 men) x36 (Conscript)
-1 morale
-1 melee
-2 firing modifier

20th NY Militia (100 men) x30 (Conscript)
19th NY Militia (25 men)
NY Volunteers (40 men)
-1 morale
-1 melee
-2 firing modifier


NY Rifles (50 men) x9 (Enthusiastic Conscripts)
-1 melee
-1 firing modifier


Fort Gray; Lewiston Heights *Can hit Queenston Heights at Long Range

Foot Artillery 2 18 pounders (Second Line)

-1 morale


From Lewiston Heights *Can hit Queenston at Long Range


Foot Artillery 2 18 pounders (Second Line)

-1 morale


Friday, 26 February 2016

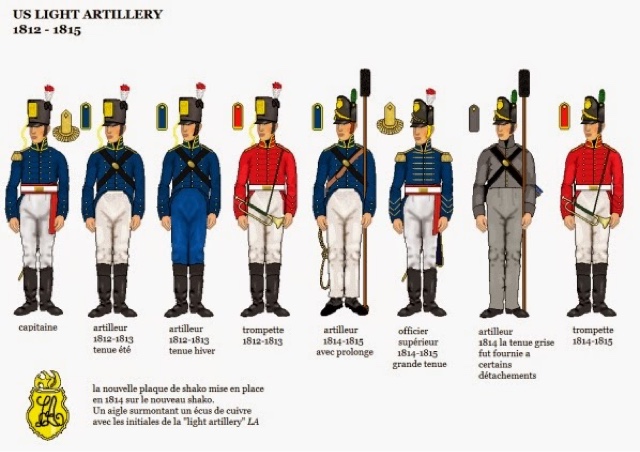
The Plattsburgh Campaign; Uniforms


British and Canadian Forces


American Forces
Line


Some regulars may have had the same uniform as Scott's Brigade.


Militia

The majority of the 2400 Vermont Militia had no uniforms, but they put sprigs in their hard to identify them. The third figure from the left would be typical. Other common clothing colours; blue, black, green. There were 96 Volunteer Vermont Rifles at the battle, their uniform is above, white with dark green fringe. 


The 7th NY Dragoons, visible above were at the battle. The most likely uniform of the 680 NY militia is the uniform second from the left. There were 20 NY rifles as well, the most common NY Rifles Uniform is third from the right,