Sunday, 21 February 2016

The New Orleans Campaign


  The peace had already been agreed upon when the Battle of New Orleans was fought. It was a failure for the British, but it was one of many invasions and raids in 1814 (and 1815). The British arrived in large numbers in 1814, but their strategy involved splitting their forces all over North America. They wasted forces on areas which had been amply defended before half the British army arrived. 

Overall, their strategy of raiding and attempting to capture outlying areas could have been successful on all fronts. As it was, they succeeded in the Niagara, in occupying Maine, burning the American capital, and in capturing and keeping several forts. They had more setbacks than successes in the invasion of the US, which is why the Americans often claim victory. The Americans main goal however was to capture Canada, and the war ended with many parts of the U.S. occupied. The Americans were successful in defeating the main British invasions and had succeeded in driving settlers out of South Westen Upper Canada. 

  The Battle of New Orleans undoubtedly had the most interesting mix of units of the war. On the American side were French Pirates, French milita infantry and artillery, free men of colour, plus Kentuckians and Tennesians mixed in with American regulars. Andrew Jackson had recently defeated the Creek Indians in the Creek War. He was probably the best American General of the war. 

  On the British side were the 93rd Highlanders, the 95th Rifles, lots of rockets, and the smartly uniformed all black West Indies regiments. 

  In hindsight, the British appear foolish to have attacked a fortified position across a swamp but with better timing and application, they had a plan that could have easily worked. The troops on the West Bank were to attack and take the batteries on that side, then shoot at the American defences with them. The West Bank attack happened too late to work. Also, although not part of the plan, the British almost succeeded in flanking the Americans on their far left, and could have easily rolled up the American line. A cautious commander did not take advantage during the battle. Either of these two differences could have changed the course of the battle. As it was, this was a major victory for the Americans; though not the last battle of the war. The British army at New Orleans captured Fort Bowyer after the battle and a force of Kentuckians defeated some Canadian militia at Malcolm's Mills in the last action of the war. 

  I just read an American history of the war they often say the battles before this point were inconclusive. This is revisionist and convenient, most campaigns of the war were American offences and ended in complete disaster. In 1814 and early 1815 the Anericans did have a lot of successes, but also setbacks. This portion of the war was a draw in most respects. 

1814 and 1815
Far West; Mackinac Island; The British had gained control of the area in 1812. A much smaller British force defeats an American attempt to retake the island. The British also capture Prairie De Chien.
British Success

South Western Ontario; The Americans under General MacArthur and his force of mostly Kentuckians raid and destroy mills aim South Western Ontario. They defeat a militia force sent against them.
American Success

Niagara; The Americans defeat the British at Chippewa then fight to a draw at Lundy's Lane. When the British reconnoiter to renew attacks in the morning the Americans have withdrawn to Fort Erie. The British try to take the Fort but fail. The British cannot take the American position and withdraw to Fort Chippawa. The Americans consolidate both of their divisions but leave the whole of the Niagara in the hands of the British (including their Fort, Niagara)
British Tactical Success

Quebec; In early 1814 the Americans made their third invasion attempt but were defeated by a small group of defenders at Lacolle Mills. 
British Success

Kingston / Lake Ontario; Control of the lake was now firmly in the hands of the British with the launch in September of one of the world's largest warships, the 112 gun HMS St. Lawrence. The Americans were in the previous process of building their own "super ship".
British Tactical Success

Northern New York; The British launch a coordinated naval and land campaign against Plattsburgh with the aim of capturing Northern New York and Vermont. It ends in complete disaster when their entire fleet is destroyed on Lake Champlain.
American Success

New England / Maine; The British occupy areas of Maine until the end of the war.
British Success

Open Seas; With the lull in the Napoleonic Wars the British fleet is free to come to America. The Americans are completely blockaded. Over half the American merchant fleet is captured by the British. 
British Success

Central United Colonies; The British were to raid targets in the area. They defeat armies at North Point and Bladensburg and burned the American capital. They were unable to take Fort McHenry or get close to Boston.
Draw

Louisiana; The British goal was to capture New Orleans. It ended in disaster at the Battle of New Orleans.
American Success

The last big battle of the war being such a clear American Victory allowed them to end the war in a more balanced position. They did not capture Canada, but they did force the British to treat them with respect. Besides the Fenian Raids after the Civil War, the Americans never again tried to expand Northwards. 


The French Uniformed Battalion of Louisiana volunteers is one of the most famous of this campaign. It had 5 companies; Grenadiers including sappers(pictured above), Francs (?), Dragoons on foot (unknown uniforms, possibly French dragoons), Chasseurs (unknown uniforms), and the Irish Louisiana Blues pictured above. They totalled 315 men. Plauche's portrait was painted in the above French uniform. It was apparently a highly professional and disciplined unit.


Free men of colour reenactors. There were two units of freemen st New Orleans; the first was Daquin's with 180 men in 4 companies. It included a grenadier and light company. They had originally been uniformed as Spanish infantry in white uniforms, their uniform at New Orleans is not known for certain. The unit existed during the American Revolution and fought gallantly in both wars.  The second battalion was newly formed under Lacoste and was ununiformed. 

An inaccurate but enjoyable movie version of the battle; The Battle of New Orleans. The uniforms in the background are post war. They also show the 93rd Highlanders in kilts. 


Two battalions of the 93rd Highlanders came to North America in 1814. The first battalion is shown above. The second batallion had kilts, it was stationed in Halifax and saw no action. 

The 1st and 5th West India regiments took part in the battle. These were Caribbean regiments, not Indian. They were well regarded by the British. 


Jackson's Line today. 


The Battle of New Orleans Order of Battle and Scenario Rules


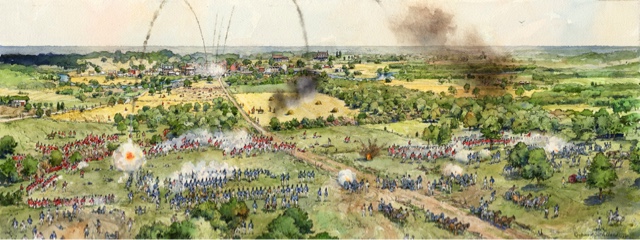
The Battle of New Orleans, January 8th, 1815


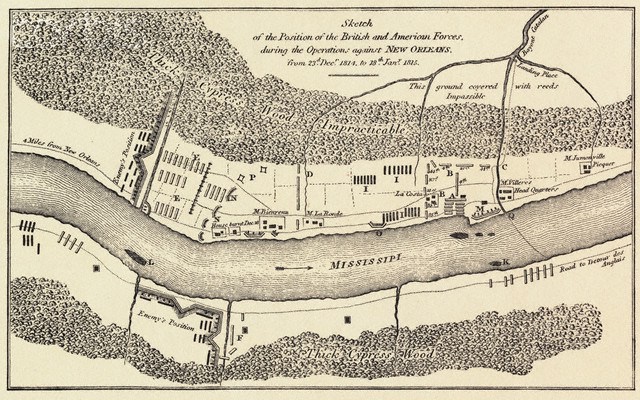
A map showing the often forgotten West Bank as well as the East.


The L Shaped battlefield for this game.

The 16 Gun USS Louisianna provided additional artillery support for the Americans. 


1=20, Each cannon = 4

British Army Special Rules

Victory Conditions; The British have to rout the American army at Line Jackson. 


1. British Infantry Shooting Bonus; British / Canadian infantry get +1 to shooting rolls when in line. Militia and Indians do not get this bonus.

2. Chosen Men; Up to 12 men maybe deployed as Chosen Men (Rifles). They roll 2D6 per 4 figures. They can form part of the skirmish screen or operate independently. They do not need to stay within 18 inches of close order units. This unit has a range of 17 inches.


British Army
Edward Packenham (Average)

*All light Companies were formed into 2 battalions for the battle. Their numbers have been subtracted from each unit.

2nd Brigade (Right)
Major General Samuel Gibbs (Average)

Battalion of Light Companies (320) X18 (Veteran)
+1 morale
Can refuse a flank
+1 to shooting in line
*Entire formation can skirmish

4th (King's Own) Foot (720) X36 (Veteran)
+1 morale
Can refuse a flank
+1 to shooting in line

44th (Essex) Foot (746) X36 (Line)
+1 to shooting in line

21st Foot (Royal North British Fusiliers) (710) X36 (Line)
+1 to shooting in line

95th Rifles, 3rd Battalion (273) X12 (Veteran)
*Chosen MenThey roll 2D6 per 4 figures. They can form part of the skirmish screen or operate independently. They do not need to stay within 18 inches of close order units. This unit has a range of 17 inches.


3rd Brigade (Left)
Major General John Keane (Average)

Battalion of Light Companies (260) X12 (Veteran)
+1 morale
Can refuse a flank
+1 to shooting in line
*Entire formation can skirmish

93rd (Sutherland) Highlanders (908) X45 (Veteran)
+1 melee
+1 morale
Can refuse a flank
+1 to shooting in line

1st West India Regiment (912) X45 (Line)
+1 to shooting in line

95th Rifles, 3rd Battalion (273) X15 (Veteran)
Can refuse a flank
+1 to shooting in line
Can form open order


Reserve; 1st Brigade
Major General John Lambert (Average)

14th Light Dragoons (210) X12 (Line)
*Dismounted, had no horses. Count as Light Infantry
Up to half the unit can skirmish

7th Foot (Royal Fusiliers) (702) X36 (Line)
+1 to shooting in line

43rd Foot (Monmouth Light Infantry) (782) X40 (Elite)
*this was one of the best units in the British army
+1 to shooting
+1 morale
+1 melee
Can refuse a flank
+1 to shooting in line
Can form open order
Up to 75% can deploy as skirmishers

5th West India Regiment (716) X36 (Line)
+1 to shooting in line

Artillery
Royal Artillery Battery (6 X 6 Pounders) X2 6 Pounder Guns (Veteran)
Royal Artillery Battery (6 X 6 Pounders)
+1 Morale

Royal Marine Artillery Heavy Gun Battery  (6 X 12 Pounders) X2 12 Pounder Guns (Veteran)
+1 Morale

Hot Shot / Firing at Ship Rules (Not play tested yet)
1. Shore Batteries; 2+ to hit at close range, 3+ at long range, -1 modifier if the ship is moving
2. Heavy Artillery; under 21 inches D3 Damage on 2+, Over 24 Inches D3 Damage on 3+
    6 Pound Artillery; under 24 inches D3 Damage on 4+, Over 24 Inches 1 Damage on 6+
3. Hot Shot; Any hit that causes damage sets the ship alight on a 5 or 6. Each successful fire does D3 damage to the ship a turn.
4. Rockets; 12; D3 Damage sets ship alight, 11-9; 1 Damage Set alight on 5 or 6

Royal Horse Artillery Rocket Troop X2 Rockets (Veteran)
+1 Morale

Rocket Rules
-Range of 48 inches, must have line of sight, may fire overhead
Roll 2 D6
12 Direct and devastating hit. Six casualties. Consult double six table
11 – 9 Target unit lose 1 casulty and falters BUA’s set alight.
8-4 Miss
3 The nearest friendly unit to the rocket battery is hit by stray rockets and loses two casulties.
2 Rockets double back and strike ammunition. Rocket battery completely destroyed. (Rout)


Column of Attack (West Bank)
L. William Thornton, 85th Foot (Average)

85th (Bucks Volunteers) Regiment of Light Infantry (560) X30 (Veteran)
+1 morale
Can refuse a flank
+1 to shooting in line
*Up to 50% of this unit can skirmish

Royal Marines (100) X12 (Veteran)
Sailors (100)
+1 morale
+1 melee
Can refuse a flank
+1 to shooting in line
Can form open order
Can deploy as skirmishers

Royal Marines Rocket Section X1 Rocket (Veteran)
+1 Morale

Rocket Rules
-Range of 48 inches, must have line of sight, may fire overhead
Roll 2 D6
12 Direct and devastating hit. Six casualties. Consult double six table
11 – 9 Target unit lose 1 casulty and falters BUA’s set alight.
8-4 Miss
3 The nearest friendly unit to the rocket battery is hit by stray rockets and loses two casulties.
2 Rockets double back and strike ammunition. Rocket battery completely destroyed. (Rout)


American Army Special Rules

Victory Conditions; The Americans must rout the British army. 

1. Linear Tactics; Line units in the same brigade have to have the same formation except to go around terrain and other units.

2. Buck and Ball; American Regulars used “Buck and Ball”; a round shot with 3 buck shots, they get +1 to hit at close range.

3. Chosen Men; Up to 12 men maybe deployed as Chosen Men (Rifles). They roll 2D6 per 4 figures. They can form part of the skirmish screen or operate independently. They do not need to stay within 18 inches of close order units. This unit has a range of 17 inches.

American Army
Major General Andrew Jackson (Excellent)

Line Jackson
*All units listed in order from the river. The cannons were mixed in with the units along the line.

American Right
Colonel George T. Ross (Average)

Lafitte's Pirate Artillery X1 12 Pounder (Line)

Riflemen X8 (Line)
Beale's Rifle's (23)
*Various Rifle Companies; Deployed behind Battery
*Chosen MenThey roll 2D6 per 4 figures. They can form part of the skirmish screen or operate independently. They do not need to stay within 18 inches of close order units. This unit has a range of 17 inches.

7th Infantry (436) X30 (Line)
Plauche’s Uniformed French Militia (315)

French Uniformed Militia Artillery X1 12 Pounder (Second Line)
-1 morale
Round down half casualties

Daquin's and Lacoste’s Free Men of Colour (462) X24 (Second Line)
*Daquin's Battalion were veterans of the American Revoloution who fought for the Spanish
-1 morale
Round down half casualties


44th Infantry (352) X21 (Line)
Company United States Marines (58) 
+1 to shooting at close range


American Left
Major General William Carroll (Average)

Light Artillery 4 Pounder X1  (Line)

Carrol’s Tennessee Militia Brigade (806) X40 (Conscripts)
1st, 2nd and 3rd West Tennessee Militia
-1 morale
-1 melee
-1 firing modifier

Louisiana Militia Artillery 6 Pounder X1 (Conscript)
-1 morale
-1 melee
-2 firing modifier

Adair’s Kentucky Militia Brigade (680) X30 (Enthusiastic Conscripts)
Slaughter's, Gray's and Mitchuson's Kentucky Militia
-1 melee
-1 firing modifier

Coffee’s Tennessee Mounted Gunmen Brigade (546) X24 +6 Skirmishers (Conscripts)
1st and 2nd West Tennessse Volunteer Mounted Gunmen
Jugeat’s Choctaw Indians (62) 
-1 morale
-1 melee
-1 firing modifier


Reserves
Cavalry *Independent Unit
Ogden (Average)
1st Light Dragoons (50) X10 (Second Line)
Hind’s Mississipi Mounted Rifles (150)
-1 morale
-1 melee

Kentucky Militia (320) X15 (Enthusiastic Conscripts)
-1 melee
-1 firing modifier

Artillery on Jackson's Line
Total 14 Guns in 8 Batteries X4 Guns Total (placed with brigades above)
*2 6 pounders, 3 12 pounders, 3 24 pounders, 2 4 pounders, 1 32 pounder, 1 18 pounder, a mortar and a 9 inch howitzer. These were in batteries of one or two guns. 
Lafitte’s Barbarians (Pirate Gunners) (36)
Light Artillery (78)
New Orleans Militia Gunners (Unknown Numbers)


West Bank
Brigadier General David B. Morgan (Average)

Naval Battalion (106 men and 16 Guns) X2 Guns (Line)
2 Guns facing West

Naval Battalion X2 Guns (Line)
2 Guns facing North

Grey's Kentucky Militia (320) X30 (Conscripts)
Major Paul Arnaud's Louisiana Militia (250) 
-1 morale
-1 melee
-2 firing modifier

USS Louisiana (Schooner) (16 X 24 Pounders) Counts as 2 X 12 Pounders Per Side
*8 Guns per Side. Position can be seen on the map. Begins the battle anchored.
8 Hit Points (Each cannon shooting at it is actually 4 cannons)
*it's sister ship had been destroyed with hot shot by the British


West Bank Reinforcements; From Reserves *Come on turn 10
Militia (400) X21 (Conscript)
*Mostly unarmed
-1 morale
-1 melee
-4 firing modifier


Tuesday, 16 February 2016

Native Troops in the War of 1812

Although British regulars bore the brunt of fighting and casualties on the British side, the importance of their native allies and also Canadian troops should not be understated. Though natives were usually present only in small numbers in most battles, the American troops were generally terrified of natives. The Americans had very small numbers of natives on their side in several actions (Chippawa was the exception with several hundred). The actions in the far West has larger groups of natives with 500 to 2500 native allies on the British side.

The Shawnee and Tecumseh's Confederated Western Warriors

  This group of natives under Tecumseh fought for the British from 1812 until the Battle of the Thames (aka Moraviatown). Tecumseh formed an alliance with the British to try and gain their own state in the present day mid-United States. These natives were from the Shawnee, but also from other groups of natives.

                              Brock and Tecumseh meet just prior to hostilities

When the War began in 1812 Tecumseh and Brock immediately attacked the Americans at Detroit. They bluffed the Fort into thinking there were many more troops than there were, and convinced them to surrender. Afterwards, Brock went to the Niagara where he was killed at Queenston Heights.  

  Tecumseh stayed with the British after the death of Brock. His warriors took part in the victory and massacre at Frenchtown (Tecumseh was not present). He took part in the protracted failed Seige of Fort Meigs. He also pressured the British into a futile attack on Fort Stephenson. After the British navy on Lake Erie was destroyed, the British had no supply line to South Western Ontario. The natives did not want to be abandoned by the British so forced them to fight a battle at Moraviatown / Thames. 

Tecumseh was killed and a large number of his Warriors were defeated along with the small Western British army at The Battle of the Thames (Moraviatown). The majority of natives from Tecumseh's confederacy, made peace with the Americans after the Battle of the Thames.


The natives would have fought in trade shirts, deer skins or with just war paint. The above example is fairly representative of most native allies. 


Mohawk Warriors

The Mohawk Warriors fought under several Chiefs. Most notably, John Norton was at almost every engagement in the Niagara. When the Americans captured the Niagara in the spring of 1813, John Norton kept fighting alongside the British when all of the other native allies abandoned them. The Battle of Stoney Creek stopped the Americans advance, its success was partly due to Norton and his natives. The Battle of Sacket's Harbour also distracted the Americans from the Niagara.  Without Norton and the Mohawks, Stoney Creek may not have been a success, and the British may have lost all of Upper Canada.

John Norton, Mohawk Chief


A Mohawk in cold weather clothing at Chateauguay. 


A Mohawk Reenactor


Other Native Allies / Western Warriors

  In1812 a group of several hundred natives and voyageurs with a few British soldiers captured Mackinac Island from the Americans. They held it until the end of the war. They defended it against a superior American force in 1814. These were Ojibwe, Odawa, Sioux, Winnebago and Menominee. The natives were lead by Robert Dickson (aka The Red Haired Man). 

  Hundreds of Western Warriors helped defend the Niagara in 1814. 


Black Hawk, Sauk War Chief


The Creek War 1813-1814


A recreation of the end of the "Creek War". The Americans defeated the Creek Indians from 1813-1814. They were not affiliated with the British or Tecumseh, but did try to resist American expansion during the War of 1812. This was a civil war for the natives the area with natives on both sides. The Americans generally consider this to be part of the War of 1812, but the rebel Creeks were not allied with Tecumseh or the British.


Wednesday, 5 August 2015

The Battle of Bladensburg Scenario Rules and Order of Battle


The Battle of Bladensburg
August 24th, 1814


                                                      Starting Positions

*1 man = 15
2 Guns = 3 Guns

British Army Scenario Rules

Victory Conditions; The British must rout the Americans. 

1. British Infantry Shooting Bonus; British / Canadian infantry get +1 to shooting rolls when in line. Militia and Indians do not get this bonus


British Order of Battle
Major General Robert Ross (Excellent)

*The British enter the table one brigade after the other. The first brigade begins as shown on the far right, then the second brigade, then the third brigade. 

1st (Light) Brigade
Colonel William Thornton (Average)

Light Companies 4th, 21st, 44th (217 men) X15 (Veteran)
Light Comp. 63, 66 +88
+1 morale
Can refuse a flank
+1 to shooting in line
*Entire formation can skirmish


85th (Bucks Volunteers) Regiment of Light Infantry (800 men) X30 X30 (Veteran)

+1 morale
Can refuse a flank
+1 to shooting in line
Up to 50% can Skirmish

2nd Royal Marines Detached Company (86 men) X12 (Line)
2nd Colonial Marines (100 men) 
*these were former slaves
+1 melee
+1 to shooting in line
Can deploy as skirmishers

Royal Marine Rocket Section (X2 Rockets) X2 Rockets (Veteran)
+1 Morale

Rocket Rules
-Range of 48 inches, must have line of sight, may fire overhead
Roll 2 D6
12 Direct and devastating hit. Six casualties. Consult double six table
11 – 9 Target unit lose 1 casulty and falters BUA’s set alight.
8-4 Miss
3 The nearest friendly unit to the rocket battery is hit by stray rockets and loses two casulties.
2 Rockets double back and strike ammunition. Rocket battery completely destroyed. (Rout)

Royal Marine Artillery (2 X 3 Pounders) X1 Gun (Veteran)
+1 morale


2nd Brigade
Colonel Arthur Brooke (Average)

4th (King's Own) Regiment of Foot (630 men) x40 (Veteran) 
+1 morale
Can refuse a flank
+1 to shooting in line

44th (East Essex)Regiment of Foot (610 men) x40 (Line)
+1 to shooting in line


3rd Brigade
Colonel Patterson (Average)

2nd Marines (600 men) x40 (Elite)
+1 to shooting
+1 morale
+1 melee
Can refuse a flank
+1 to shooting in line
Can form open order

21st (Royal North British Fusiliers) Regiment of Foot (884 men) x32 and x32 (Line)
+1 to shooting in line


Not Engaged, Guarding the Shore 
Converged Royal Marines Battalion (564 men) X36 (Elite)
+1 to shooting
+1 morale
+1 melee
Can refuse a flank
+1 to shooting in line
Can form open order


American Army Scenario Rules
Victory Conditions; The Americans must stop the British from reaching Washington. 

1. Linear Tactics; Line units in the same brigade have to have the same formation except to go around terrain and other units.

2. Buck and Ball; American Regulars used “Buck and Ball”; a round shot with 3 buck shots, they get +1 to hit at close range.

3. Chosen Men; Up to 12 men maybe deployed as Chosen Men (Rifles). They roll 2D6 per 4 figures. They can form part of the skirmish screen or operate independently. They do not need to stay within 18 inches of close order units. This unit has a range of 17 inches.


American Order of Battle
William H. Winder (Poor Command)

First Line (Far Forward Left)
(Average Command)

Baltimore Rifles (150 men) x18 (Second Line)
Virginian (James City) Light Infantry (100 men)  
-1 morale
This entire unit can skirmish 

Baltimore Artillery (4x6 Pounders) x2 Guns (Conscript)
-1 morale
-1 melee
-2 firing modifier

Baltimore Artillery (4x6 Pounders) x3 Guns (Conscript)
-1 morale
-1 melee
-2 firing modifier


Second Line (Forward Left)
(Average Command)

5th Baltimore City Regiment 500 men  x40 (Conscript)
-1 morale
-1 melee
-2 firing modifier

1st Baltimore Militia (675 men) x40 (Conscript)
-1 morale
-1 melee
-2 firing modifier

2nd Baltimore Militia (675 men) x40 (Conscript) 
-1 morale
-1 melee
-2 firing modifier

Baltimore Artillery (3x6 Pounders)  x2Gun (Conscript)
-1 morale
-1 melee
-2 firing modifier

Cavalry *Independent Unit
(Average Command)

Maryland  District Cavalry 260 men (Conscript) x21
4 Companies Maryland Cavalry
DC Alexandria Dragoons 40 to 50 men
-1 morale
-1 melee

Third Line
Left
Scott (Regulars) Smith (DC Militia) (Average)

12th / 36th / 38th US Infantry (400 men) x30 (Line) 
+1 to shooting at close range

1st DC Militia (535 men) x42 (Conscript) 
-1 morale
-1 melee
-2 firing modifier

2nd DC Militia (535 men) x42 (Conscript)
DC Detachments (200 men)
-1 morale
-1 melee
-2 firing modifier

DC Rifles: 3 Companies (330 men) x18 (Conscript) 
-1 morale
-1 melee
-2 firing modifier
This whole formation can skirmish

Washington Irish Artillery (6 6 Pounders) x4 Guns (Conscript) 
-1 morale
-1 melee
-2 firing modifier

DC Militia Artillery (6 6 Pounders) x4 Guns (Conscript) 
-1 morale
-1 melee
-2 firing modifier

Centre

U.S. Flotilla Servicemen (200 men) x24 (Veteran)
U.S. Marines (120 men)
+1 morale
+1 to shooting at close range

Naval Guns (18 and 12 Pounders x5 Guns) x3 Guns  (Veteran) 
+1 morale

Right

Annapolis Militia (800 men) x24 and x30 (Conscript)
-1 morale
-1 melee
-2 firing modifier

Reserve 

Maryland Militia (250 men) x24 (Conscript)
-1 morale
-1 melee
-2 firing modifier

Reserve Cavalry *Independent Unit
Colonel Jacinct Laval (Average Command)

2nd Light Dragoons (140 men) x16 (Second Line) 
Virginia Militia Dragoons 100 men
-1 morale
-1 melee

Reinforcements *Arrive turn 15 

60th Virginian (700 men) x24 and x24 (Conscript)
*Arrived late and out of ammunition
-1 morale
-1 melee
-2 firing modifier