For most of our battles we take different sides each time. We are all experienced with this rule set, and typically no big mistakes are made in our games. So... why do the Americans keep winning?
The Americans won the Battle of Montreal "What if..." Scenario again. The British began the battle deployed, with artillery set up, more infantry, slightly less but better cavalry, better command and just slightly less artillery. It was a very close battle up until the last couple of turns where a couple of rolls meant several British units were routing on top of a brigade on "retire" and a completely dispersed British cavalry brigade.
This is the time period I had created my army for; 1813, specifically Niagara 1813 and the St.Lawrence campaign. Uniforms changed so much during the war that the American infantry would have looked like this for this year only.
The Battle

In the foreground is a tributary of the St.Lawrence, this is the American right, and the British left: which is made up entirely of French Canadian Select Embodied Militia. In this scenario I am playing the American left, right beside the mountain, which includes two battalions of infantry, a rifleman detachment, 2 batteries of guns and all the U.S. Cavalry. The other 2 American players have 5 battalions and a large battery of guns each, plus riflemen.

Here is the American left (me), facing off against a brigade of French militia and Indians. The brigade behind the fence was unable to change Prevost's hold orders for the entire game, but stopped me from pursuing the militia brigade which broke. The Brigade behind the fence was a small brigade but contained the two best British units; the Royal Marines (played by British Guards today). His two rockets and his twelve pounder killed one of my batteries of guns and a cavalry unit. My cavalry was hoping for an easy win vs. the militia. Just to the right of the cavalry visible is a second unit of my cavalry which absorbed a lot of fire, mainly from the two rockets and twelve pounder, and dispersed.

The Americans deploy into line and advance.

The U.S. Right, and British left manoeuvre for advantage.

My smaller unit of cavalry fails its charge because of artillery fire and disperses. My larger unit succeeds in reaching the French Sedentary Militia but they formed square! I was driven off behind my own lines but remained in good order. British Marine rockets also take out my 6 pound battery and my guns disperse.

In the British centre the 19th Light Dragoons (at right) and French Canadian Light Dragoons (at centre) position to charge the U.S. Guns and American lines. The 19th Light Dragoons take heavy casualties and disperse.

On the U.S. Left / British Right a unit of Voyageurs and a unit of Indians disperse from casualties in our skirmisher battle. The whole Brigade of French/British militia and Indians breaks and falls back. They remain broken for the rest of the game.

Another view of the U.S. Left with my cavalry reformed. My twelve pounders are just out of sight to the right of my cavalry. My artillery threatened the British enough that the Brigade behind the fence did not start trying to change orders to advance until around this point in the battle. Twelve pounders have a longer range for cannister and hit harder than six pounders.

A view of the intense but even firefight along the St.Lawrence (a tributary not the main river) side of the battlefield.
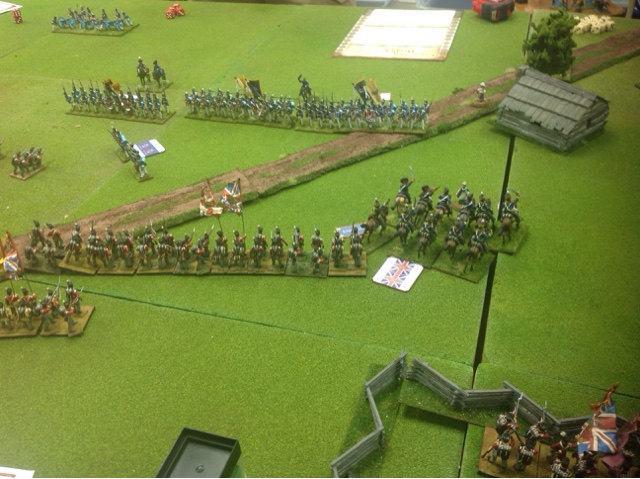
In the centre, the Canadian Light Dragoons successfully charge and break the 5th U.S. Regiment.

Two French ladies cheer on the French cavalry as they run down the Americans.

My second unit of Light Dragoons is now out for blood. They position to counter the Canadian cavalry.

On the British left one of the three units of SEM breaks from the firefight. Things are not looking good on the British / French Canadian Right and Left.

A view of the field from Mount St. Royal. The French militia and Indians remain broken to the rear. The Marine Brigade fails to change their orders. The British command stays in the centre to help boost the British and Swiss (De Meuron regiment; made up mainly of POWs from the peninsula). Because of this, these crack units of British remain unengaged. I tentatively approach them with skirmishers and shell them with my twelve pounders.

A successful cavalry charge and counter charge means an almost equal melee. The De Meuron Regiment can be seen breaking and retreating behind British lines in the background. In the centre each side has lost one line unit.

The Americans take advantage of the hole in the British lines. The Anerican cavalry defeats the Canadian Light Dragoons. The British Cavalry brigade is now completely dispersed.

Another view of the centre.

Another unit of French SEM breaks, the remaining unit is now severely outnumbered. The British / French now have lost enough units that they have to take an army morale test. They fail and rout the field.

Another view at the end of the action. Three British units remain out of action behind the fence. They probably could have defeated my two depleted units. Prevost was a cautious commander so all British but the Militia began the battle on hold orders.
Battle Aftermath...
So what would happen now? The Americans had only one unit of Cavalry so would not be able to follow up on their victory. Montreal is a walled city. There are two more SEM units guarding the city plus English and French militia. Not to mention that 3 units of British remained fresh after this scenario. Montreal is a Kilometre away from this battle site. Surely the British and Canadians would retreat within the walls. Without French support the Americans probably stood little chance of following up.
The Americans suffered heavily during this battle as well, probably 25% casualties, they also lost 20% on their way down the St.Lawrence; for a total of 45%. If this scenario took place after our version of Crysler's Farm then the US forces would be at less than 50%. The Americas brought along 18 Seige guns but no cold weather clothing, and they were out of food. It would now be mid November in Canada (already very cold). After this battle the Americans would probably have 3500 effectives vs. 4500 to 5000 British and Canadians.
The Americans would probably have to withdraw to the American side of the River. Montreal already had a large proportion of British by this point, so an uprising to join the Americans seems unlikely. The British could also call upon more units from the South East (including DeSalaberry's force) and East (the Garrison at Cornwall) which alone would almost be equal in size to the remaining American Army, making the beseiging army outnumbered 2 to 1. The Isle of Montreal is 50 km long allowing for guerrilla warfare against the Americans.
The Americans won the battle but probably not the city. It would be similar to the Chesapeake campaign. The British won at North Point, but the Americans retreated to Baltimore which the British realized they could not take so left the area.
French Uprising?
Apparently during the war there was widespread French dissension about conscription which was hushed up by the British. If the French in Montreal joined with the Americans the British would be lucky to keep anything but Halifax, they would probably lose the rest of Canada. If Canada had fallen I have little doubt that when Napoleon was defeated, an even larger British army would have come in 1814, possibly lead by Wellington.
Of the army in Quebec and Montreal the following units were fully French;
1. Canadian Voltigeurs Regiment (Excellent Troops)
2. Canadian Fencibles (Line light infantry)
3. Eight Full Regiments of Select Embodied Militia (second rate line)
4. 500 Voyageurs
5. 5 or 6 Troops of Light Dragoons
6. 2 Small Batteries of Guns
In Addition;
7. De Watteville's and De Meuron's Regiments were 75%
POWs from the peninsula. (Swiss, Poles and Germans)
*In addition, the American Army had 48 regiments, 2 large Cavalry regiments and a lot of artillery.
That's 13 Regular French regiments. Probably equal to all British troops in all of Canada in 1813. Not to mention the 60000 French Sedentary Militia. If even half of these forces joined the Americans the British would lose Canada in 1813.
The British army in 1813 consisted of;
1. 13 Foot Batallions
2. 3 Squadrons on the 19th Light Dragoons
3. 3 English Fencibles
4. 20000 English Sedentary Militia (half were in the Maritimes)
5. 2 Battalions of Royal Marines
6. Several Batteries of Guns
7. 2 or 3 Militia Troops of Light DragoonsWould they have joined the Americans if the Battle of Montreal was lost? Who knows, but it's possible.
A most impressive game and a very good AAR. You have given me inspiration to try this what if battle but after we do Bladensburg, North Point and New Orleans.
ReplyDeleteAnother good what if is a different Plattsburg battle. Izard's division returns sometime after the British assault with a random dice throw for varying times. What do you think?
BTW I really enjoyed reading your blog...it is outstanding. I check it every other day to see if there are any developments. I particularly found your figure manufacturer assessment most useful.
It is nice to see another gamer focusing hi effort on the War of 1812. It is such a great period to game with GdeB rules.
Cheers,
Rod
Thanks for the feedback Rod! Good idea for Plattsburgh, we will definitely be doing that one as well. I also thought about a what if for Plattsburgh where the British attack earlier and try and capture the shore battery to aid the fleet.
ReplyDeleteWhich was the British plan, it just didn't work out!
ReplyDeleteAnother most interesting game and counterfactual Chuck.
ReplyDeleteThe British command seems to have been uncoordinated on this day. Why did they advance from such a good defensive position in the first place?
Enjoyable photo-report, thanks!
Glad you liked it! The British were trying to flank the Americans as they avanced but the Americans kept rolling better.
ReplyDeleteI think on the left my skirmishes killed 3 times more than theirs did.
This game was a lot of fun for all concerned. Thanks for all your work on this, Chuck!!
ReplyDelete